The above photo is overexposed. The photo suffers from some loss of detail and is just too bright. Below is the same photo after applying the Shadow/Highlight filter.

 Fixing Overexposed Photos, Pre-CS — The Layer Sandwich TrickIf you don't have CS, then the following trick will help you achieve similar results.
Step 1 — New Layer
Open your photo and make a copy of the Background Layer by choosing Layer> Duplicate Layer, or by dragging it to the New Layer Icon at the bottom of the Layers palette.
Step 2 — Change The Blend Mode
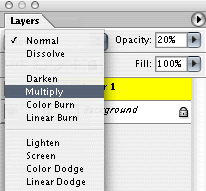
In the Layers palette change the Blend Mode of the new layer from Normal to Multiply. This will darken the photo uniformly.
Step 3 — Repeat
Now repeat the entire procedure again. Create a new layer, change the blend mode to multiply, and then take a look at the result. Continue doing this until you go from "it's almost perfect" to "it's ruined!"
Step 4 — Lower The Opacity
Now leave that last layer active even though it's taken you too far and lower the Opacity using the slider at the top right of the layers palette. This lowers the intensity of the effect. When you've found the right amount, you can flatten your image.
Step 5 — Flatten And Save
Choose Layer> Flatten or use the palette’s flyout menu and choose Flatten Image. That's it. Save your file (File> Save) and you're done.